
If you read the previous installment of Project Motovan last year you might have picked up on how much I was enjoying the freedom of owning a 4x4 camper van. The ease of being able to load up the van during the week and hit the road on the weekend to a destination far from civilization really makes life easier and maximizes the time camping. You may also recall the issues I had with the original interior build quality. Nothing has changed, yet a lot has changed since that time. I still have the same outlook on camper vans, and unfortunately I still have had more issues with the original interior build. Luckily some serious changes have been implemented to improve the future of Project Motovan. Read on for more.
Project Motovan Stories:
Part 5

Hearing my father and brother were going to be coming in from Australia a few weeks before the rest of the family at the end of last summer, I wasted no time in scheduling a van outing for the three of us. We had initially planned to head up to Pismo Beach to camp and drive the van around the dunes, but once the weekend rolled around the weather forecast was looking a little cold. My father instead suggested we hit the So Cal high desert where he spent earlier years in life riding dirt bikes and camping in his VW Bus, and often traveling with my grandparents in their Open Road Chevy campervan. I guess the saying the apple doesnt fall far from the tree reigns true as I carry on the family tradition of the campervan!
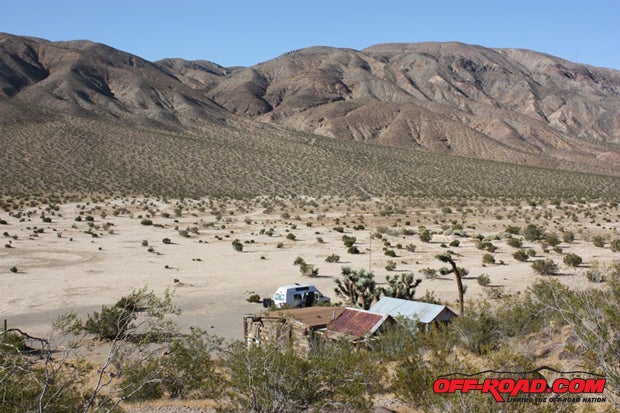
Camping at an old airstrip where Chuck Yeager is said to have frequented on weekends provided the scenery of a few old cabins and some well-needed solitude away from the city. With the desert hovering at just over a 100 degrees Fahrenheit during the day and the mid 80s at night we were thankful to have air conditioning when needed. Setting up camp consisted of putting out the chairs, folding down the upper bed and unrolling the sleeping bags. I think of Motovan as a well-outfitted mobile 4x4, diesel-powered bachelor pad with a bunk bed. The time savings alone over setting up a tent and all the other outdoor camping type equipment is a key for me in maximizing my time spent just enjoying each outing.
As the sun was descending on the El Paso Mountains all was going quite well. What could be better than hanging out with family, barbequing some steaks and listening to some interesting tunes my brother had brought from down under (take a listen to Cows with Guns by Dana Lyons for a laugh). Yes, all was going well until my brother and I went in the van to organize things and get ready for bed. As he started to crawl up onto the upper bed I was on the lower bed leaning forward getting something off the bench seat when I heard and felt a LOUD crash.
Get the Flash Player to see this player. |
Turning around I just caught a glimpse of the upper bed hitting the sink counter behind me and my brother tumbling onto the lower bed. Younger brothers always bring the drama, and this was no exception! If I hadnt been leaning forward I would have been hit. Inspecting the brackets holding the upper bed to the tracks later revealed the original welds from the bed brackets to the roller pins had failed not good! Reality set in pretty quick once we realized a few things. If I had been asleep on the bed below I very likely at a minimum would have been injured, or possibly killed. Worse yet, someone besides me could have been hurt or killed as the bed was metal framed, very heavy and sharp in spots like the brackets. Shocked yes, but surprised no, as this was right on par with the rest of our experience with the interior and electrical work so far.

.")
This was to be the final chapter of Project Motovan and Colorado Camper Van. Although Derek says his business is now thriving and he did offer to pay to have the pins that broke re-welded, I wanted no part of reusing that bed and set out to find someone more local to me for help. I wanted someone I felt I could trust with my familys safety and someone that I could also take the van back to for local repairs if anything were to need fixing in the future. After exchanging a few emails with Chris from UJOINT 4x4 van conversions he recommended Wicked Fabrication, a somewhat local fabricator to me located in North Hollywood. As the saying goes it did turn to be a small world, as I had already met Mike of Wicked Fabrication at a local van meet where I had also met Chris the first time. It was comforting to get a first-hand recommendation by someone already proven in this industry like Chris.
During my first meeting with Mike I was able to see his own van that he had recently installed a UJOINT 4x4 kit on as well as learn about a previous project truck he built that was featured in a magazine. Convinced that Mike would be able to come up with a new solution for the upper bed, I brought over my van and we starting going over some ideas. One thing led to another and after a few weeks of seeing his skills, quality of work and more importantly his dedicated attitude to do a professional job, what was intended to be just an upper bed redesign turned into a near full interior rebuild. I wasnt at all excited about having to spend money on a second interior build. but after what I had been through it was well worth it to me to have it done right this time.
There were a few major functional items I wanted to address with the original build anyway, with the first being the lack of usable storage space. In the original build I had wanted to avoid the cramped feeling of some of the vans I have been that were loaded with cabinets. On my request, it was originally designed with only a few cabinets but I quickly figured out after a few trips there wasnt enough storage space for clothes and other basic items, which resulted in having to carry additional duffel bags. With just me camping in the van an extra bag or two isnt a big deal, but when you have three people each with their own bags things get cluttered in a hurry. I wanted to avoid a cluttered van as much as possible.
After some discussion and planning Mike and I decided to move the National Luna fridge/freezer over in front of the main bed and put it on heavy duty slide outs. This would allow quick access to the electronics underneath and allow the ability to have the fridge right next to the counter when preparing food. Where the fridge used to reside, Mike made a large pull-out drawer to store the Porta-Potty, toilet paper and any other miscellaneous items. Above that drawer rests a cabinet with sliding doors and multiple shelves. This really allows a lot of storage for clothes and living-type items with simple access whether the lower bed is stowed or extended. I also had Mike rebuild the head-level cabinets to make them deeper and more functional than the originals.

The second item to address had to do with moving the microwave to somewhere more accessible. In the original spot the microwave was low, unusable if the lower bed was pulled all the way out and it also ate up valuable potential kitchen drawer space. Placing the microwave up at head level in the rear of the van was a great solution for ease of access under most all conditions. We had intended to then just add a shelf and cabinet door to where the microwave was, but after discussing how useless the original sink area was for storage we decided to scrap the entire thing and build it over. Mike fabricated a metal structure for rigidity and then attached high-quality wood to the frame. We ended up with a vastly more useful set of drawers and cabinets complete with shelving for the kitchen area.

The third item was to strengthen the main lower bed, which had a developed a broken handle as it would slide out while driving and was very difficult to push back in due to the weight of the Futon I was using. This task was tricky but Mike was able to create a clever metal frame with heavy-duty slide outs around the existing AC/Heater unit, water tank and electronics. The bed no longer slides out on its own while driving, and now it locks out in two sleeping positions. In addition it can tilt up if I need to gain access to the water tank or AC/Heater. To gain access previously to the AC/Heater or electronics I had to disassemble the entire bed, which is not easily done while camping and a pain in general.
We both ventured into new territory when deciding on the cabinet finish. Wanting something durable we went with laminate, something Mike hadnt worked with before. Wanting to learn more about it Mike did some research, went out and bought the proper equipment and proceeded to do a killer job on his first try after some side experimenting. The finished laminated sections of the van really make it feel much more finished than the original wood. Along with the laminate, Mike installed some high-quality latches in the cabinets and drawers that really add to the look and function of the interior. No longer do I have to worry about cabinets or drawers flying open while driving. To finish off the exposed vulnerable floor and cabinet edges, he fabricated some brushed aluminum pieces, which should help to prevent wear-and-tear damage I was experiencing from typical camping abuse.
The last major item was, of course, the upper bed redesign. While the original design was clever and allowed more headroom when sleeping on top, it blocked access to the front overhead cabinet and ended up being a huge safety risk. After removing the original bed and literally leaving it for scrap metal, Mike had to do some carpet repair from where one of the original bed brackets had sliced through the carpet and into the insulation. Mike did a great job being careful pulling the bad carpet away from the critical insulation and adding new, darker carpet and some black wood accent trim where the pieces joined together.
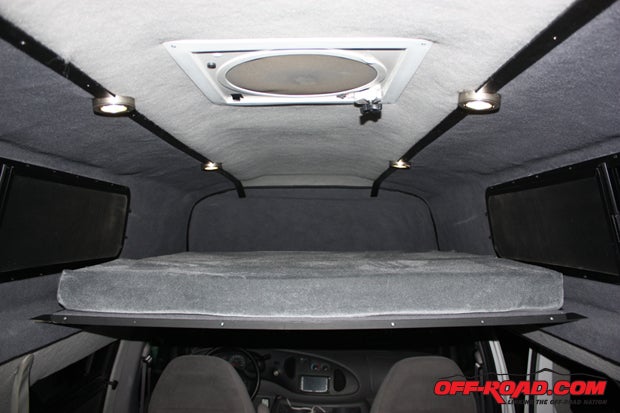
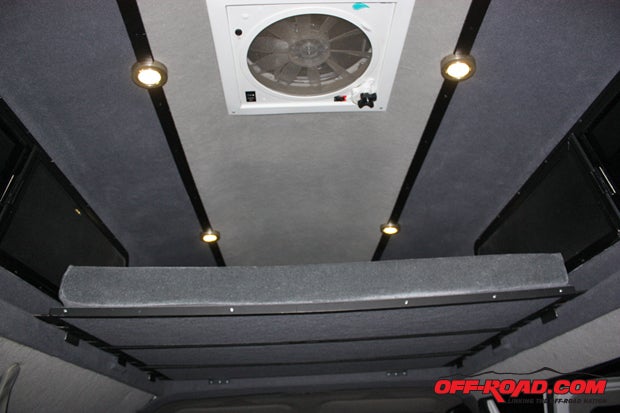
Taking from a design I had seen on another van, Mike and I agreed on going with a removable upper sectional bed design. He removed the original upper overhead cabinet so that area could be now used as part of the actual upper bed as well as storage for the bed sections when not in use. Mike designed each section to lock together and have the outer edges rest on top of the sides of the van at the original roofline. For extra safety he also added vertical brackets that prevent lateral movement so once all the sections are locked together and resting on the sides of the van the bed isnt going anywhere. I did loose some headroom but I will take the safety of this new design any day, as the headroom doesnt impact sleeping.
The beauty of the new upper bed is that because we used the original overhead cabinet area as part of the actual bed the total overall length now only comes out to over the bench seat below. This leaves the lower living area free for standing and walking around, whereas before if the upper bed was deployed you couldnt stand up or do much of anything until the upper bed was stowed. Now I can leave the upper bed deployed the entire trip, leaving more time for fun while still keeping the functionality of the rest of the lower living area. Mike also put more comfortable foam in the original cushions making the two nights I have slept in the upper bed so far very comfortable. As a bonus I can leave the entire upper bed and cushions home when not needed and gain the added storage space above the front seats.
With the Project Motovan taking on a new-and-improved interior over the last few months, it was time to head out on the road for some shakedown camping trips. After a quick email to my father in Australia telling him about two outings in a row down in the desert near the Salton Sea, he had his tickets booked to So Cal within a couple days. The first trip was once again to meet up with family from Arizona down at the Glamis North KOA campground. We thought last years toys were cool, but this year my family had a new Polaris RZR XP 900 as well as a their tricked-out Yamaha Rhino. When we werent enjoying the new natural mineral spring pools at the KOA, we were out on the trails making a stop at Slab City to see Salvation Mountain and some East Jesus desert art, a must-see location.


The following weekend we were headed back down to other side of the Salton Sea to the first set of GPS coordinates for the second annual Expedition Portal So Cal Desert Rendezvous. After last years successful event pulling in around 60 off-road vehicles, we werent about to miss this one that had 100+ people pre-registered. My father and I arrived in the area early to first run some sand washes over in the Ocotillo State Recreational Vehicle area. We stopped at the Seventeen Palms site before catching the marked Truck Haven trail back to the highway. From there we made it to the first checkpoint and were given the coordinates to the real camp, which after battling some serious soot in 4wd turned out to be in a sand wash right by an active train trestle.


As the weekend progressed I would guess we had around 70 vehicles or so actually make the event. There was a great 4x4 van showing this year with a few home builds in various stages, including Mikes personal beast with 38 tires. Other vehicles included some well-outfitted Toyota Tacomas, Land Cruisers and even the random deuce-and-a-half military vehicle turned camper. Zach from Overland Gourmet cooked up some killer gourmet hot dogs and I enjoyed the Thanksgiving Dog, which included a turkey dog on a bun, stuffing and Thousand Island dressing. Dave from Tacodoc.com did a fantastic job as usual with the planning, vendor raffle organizing and logistics of such a big event. If you are interested in attending one of these awesome rendezvous outings check out Daves site for previous event photos and the future schedule as they have both desert and mountain Rendezvous destinations, all of which I have managed to attend in the van so far.
As night rolled around Mike had one more trick up his sleeve to reveal to the Rendezvous crowd that he had built into the door of my van. Behind the custom swing-out cabinet attached to the barn door Mike had built a wine rack complete with LED mood lighting. It was very creative and very cool to have a little wine bar with a drop-down cheese-and-cracker table. My father was really appreciating this new feature over the weekend. After a couple of fantastic nights under the stars in the much-improved Project Motovan this years event was over, with some folks like us heading home and others heading out on trail runs to complete the weekend.

To say the revamp of Project Motovan was a success would be an understatement. The layout changes have proven to be far more functional over the original design, which only came about from actually getting out in the van and seeing what worked and what needed changing. The build quality and materials should prove much more durable over the original build, with the only negative being the added weight to the van. To date I have not had any issues with the mechanical work done by Colorado Camper Van and the 7.3 diesel has been fantastic, especially in the mountains, averaging 13.5-15 MPG overall. Somewhere down the road I do plan to redo the original wiring job to correct the confusing and potentially unsafe mix of black and red wiring and also to swap out the orange extension cord for a real power cord. Besides that I will be out enjoying Project Motovan every chance I get. Long live the Campervan!
CONTACT
Wicked Fabrication
818/535-5445
Check out other Project Motovan Stories:
Part 5
|
Off-Road.com Newsletter Join our Weekly Newsletter to get the latest off-road news, reviews, events, and alerts! |
Follow @Off-Road
 Your Privacy Choices