 comes off fairly easily. Well be replacing it with a new Tom Woods double-cardan-style front drive shaft.")
When it comes time to modify a vehicle for off-road use, its easy to get wrapped up in the excitement of whats possible and quickly forget that stock vehicles are built and designed to function great as is. When they start getting modified with trail-worthy upgrades, all of those stock parts in balance and harmony get thrown out of whack. Adding a suspension lift, larger tires and other off-road upgrades put added stress on the stock geometry, and in order for the vehicle to still operate properly and avoid unnecessarily wearing out parts, its important to try and get things back in harmony or as close as possible.
As is the case with most builds, weve run into a few challenges during our Jeep Grand Cherokee Project, but we knew that going in. It would have been much easier for us to start with an easier platform such as a Wrangler, a vehicle for which there is a multitude of proven parts available so making it trail ready would be a much simpler task. Having previously owned and worked on a TJ Wrangler, we know just how great this platform is on the trail after a number of adventures that included taking it on the Rubicon Trail in Northern California. The biggest issue we had with the TJ had nothing to do with performance, however, and was more related to the storage limitations with the vehicle, especially with a growing family. So, we decided to take the trail less traveled and opted to modify the readily available WJ Grand Cherokee (99-04), as this platform not only provided us with a full backseat and ample storage in the rear, but it also has a little more trail credibility versus newer Grand Cherokees since it was the last live-axle GC. It doesnt hurt that we found ours for less the $2,500.
One key hurdle to overcome with the uni-body WJ is that it sits very low to the ground. Even with our 4-inch BDS Suspension upgrade, the Grand Cherokee would still only accommodate 31-inch tires. Since we wanted to move up to 33s, we knew wed have to cut some of the sheet metal to make it fit, and thats where we turned to Bushwacker fender flares during our build. After modifying our Grand Cherokee to accommodate the flares, 4-inch BDS lift with upgrade Fox Shox, 33-inch Mickey Thompson MTZ tires and Sidebiter II wheels, we needed to swap out the stock 3.55 gears in the WJ for something that would better complement the larger 17-inch wheels and bigger tires. So we turned to G2 for a set of 4.56 gears, and while we were in there changing the gears we decided to also improve our off-road traction by adding front and rear Detroit E-lockers.
Although BDS told us wed likely need to replace the front driveshaft, it wasnt until we installed the new gears and lockers that we noticed a major change in the angle of the front drive shaft and additional vibration when driving. We reached out to Tom Wood and started looking at our options with his Custom Drive Shafts. Tom is not stranger to the off-road world, having worked in the industry for a few decades before he finally decided open his own shop in the late 90s in Utah. Since then, he makes custom drive shafts for just about every vehicle that people wheel, including Wranglers (CJs, JKs, TJs, etc.), Broncos, Land Rovers, FJ Cruisers, and more. We knew Tom would be the perfect place to find a drive shaft for our Jeep, and sure enough, right there on his homepage was a link for WJ and ZJ applications.
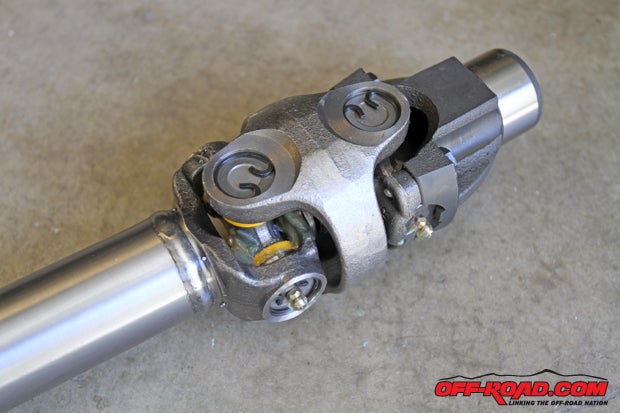
After getting the proper measurements, we ordered a double-cardan CV drive shaft, which features a 2-inch tube, full-length extended-lift spline with dust cap. Our new drive shaft also includes 1310 Series u-joints (three in total), which is backed by what Tom Wood describes as the best warranty in the world. If you ever manage to break one of these universal joints, not only will they replace the part but they will also cover the damage to the drive shaft. Follow along as we install our new Tom Woods Custom Drive Shaft on our WJ.


 can be very helpful and far less frustrating!")


Once installed, be sure to inspect the drive shaft for proper fit and function. One method checking proper operation for driving it is to jack up the vehicle and let the suspension hang freely, rotating the drive shaft by hand to make sure theres no binding. If everything appears to be operating properly, slowly drive the vehicle in forward and reverse to double check it is not binding anywhere during operation.
If youve purchased a new drive shaft from Tom Wood, one key point he stresses is that regular maintenance is important to the life of the joints. It is suggested to use a grease with a temperature rating of at least 250 degrees (Fahrenheit), scheduling greasing for every 6,000 miles or after an extremely muddy or watery trail ride, and it is suggested to grease joints until clean grease comes out of the seams so its obvious the dirty grease has been flushed out.
CONTACT
Tom Woods Custom Drive Shafts
877/497-4238
4xShaft.com
Other Project WJ Stories
Install: G2 Gears and Detroit E-Lockers
|
Off-Road.com Newsletter Join our Weekly Newsletter to get the latest off-road news, reviews, events, and alerts! |
Follow @Off-Road
 Your Privacy Choices