 |
| We experienced a misfire on a recent trip, and we set out to determine the cause. |
To fix a miss: chasing a misfire is an exercise in diligence. Many potential culprits exist for the typical misfire, so ironically, there is nothing typical about it but its diagnosis. Electrical? Fuel? Hard parts? Age? Wear & tear? Bad gas? Is it simple or complicated? Low-buck or pricey? A 10-minute fix or 10 hours?
En route to Sierra Madre (for a Fatso Jetson show – desert metal at its finest), our trillion-mile gen-three 4Runner (follow its build here) developed a stutter. Beyond the agony of missing Fatso play in their own restaurant, we now got to anticipate the short-tempered bliss of tracking down a miss. Vague, endless opportunities for dead-end diagnosis were laid before us, all possibly responsible for the misfire now making a molehill of our mountain of a truck.
Without applying sensible practices to the process of miss repair – shade-tree steps for the at-home mechanic, all stuff we’ve done ourselves – this could turn into a tedious job that doesn’t solve the problem. Do yourself a favor, keep things straightforward: fixing a misfire means step-by-step attention to little details.
Sensible Method for Trucks: Science, Not Voodoo
As with our Toyota, so suffer many makes – a misfire can happen to any vehicle. This story will bear fruit for any well-mileaged truck owner, because these diagnostic steps are relatively universal (when isolated from our fixes, which tend to be more Toyota-esque).
 |
|
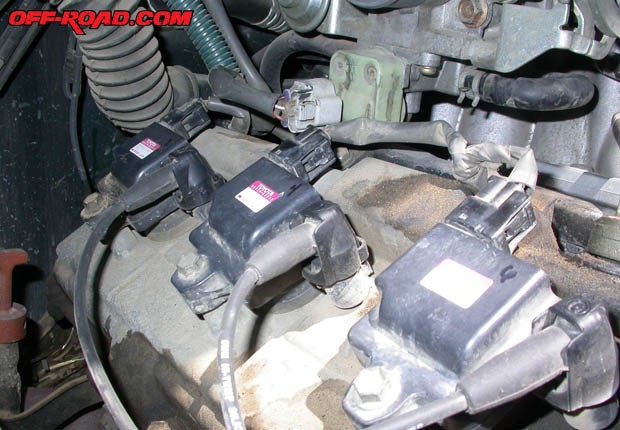
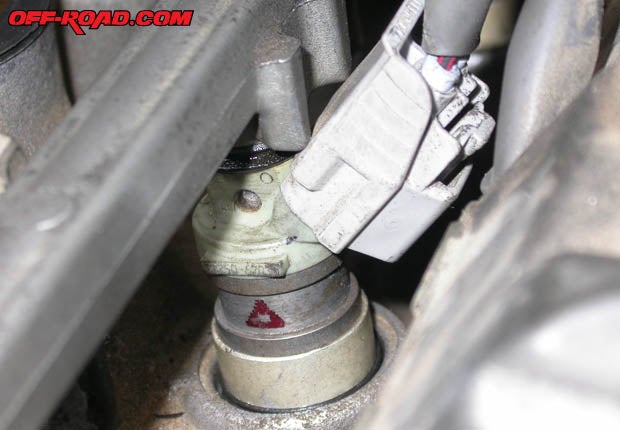
Suspect #1, though incorrect, was one of three waste-spark coils (already swapped for testing in this photo). |
Let’s assume you’re one of the bulk of truck owners today who are at least partially computer-controlled. In our case, when we plugged into the OBD2 port, the dreaded “P0304” code popped up: a misfire specific to one hole - #4 (in the 3.4-liter V6). A code reader will reduce your list of suspects from many to some: buy one. Online or from your local retailer, you can get ‘em for less than $100 (though we always recommend brick-and-mortar shops for this sort of thing due to the potential need for serviceability).
While we were chasing details of the intermiss (intermittent misfire – you can use the phrase, but it’ll cost you a dollar), the ability to ask the computer for specifics turned dozens of potential targets into a few, and it kept us focused on one cylinder. If your truck is not computer-controlled, learning to read plugs (more on that later) is a good substitute.
Scientific method is essential to sorting out mechanical mysteries (actually “sensible method,” in our case), not guesswork. Roughly defined, scientific method is the alteration of one factor and measurement of the outcome, and it lets you pay attention to one suspect at a time. Make a solitary change, and any difference in behavior can only be a result of that change. Pair your scientific method with a plan – be it testing the cheapest parts and moving to the more expensive, or from the most convenient to the most difficult – and you have sensible method. You heard it here first. Think about it: if our intermiss went away after replacing plug wires and using a bottle of injector cleaner, was the problem bad wires or a dirty injector? Sensible method means repairs are simpler to interpret, and as an aside, more educational about your truck underhood.
Start With Cheap: Plugs & WiresThough we suspected the misfire was a bad coil (typical of 3.4-powered Tacos and 4Runners with advanced mileage), the first suspect we investigated was the cheapest: spark plugs. Ours had been replaced around 155K (with the truck at 175K now), and when we pulled ‘em, every one looked right – no arcing around the body, good electrodes, and most with good color. Our analysis underlined that #4 was the bad hole: the plug read lean. Showing lean was our first confirmation there was a fuel problem, but injectors were further down the checklist and required substantially more work than plugs, wires and coils. To cover our examination with proof, plugs #4 and #2 were swapped, but the intermiss stayed at hole four.
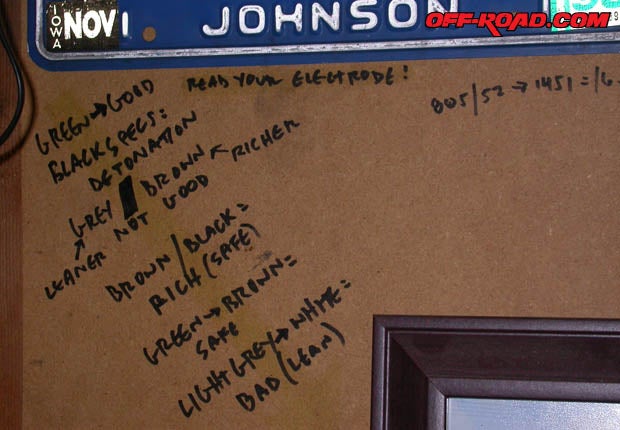 |
| When reading plugs, we refer to notes jotted down on the back of the workbench. Sharpies – don’t leave home. |
Some rules for reading plugs? We nabbed generalizations from Mustang builder Ray Choi.
1. The right plug color means good mixture: cinder green to ash brown is good, with newer engines trending greener. Grey is leaner, brown is richer. A brown toward black electrode indicates you’re overly rich. An electrode that’s light grey or white is getting too lean.
2. Check your plugs often to learn what they look like under particular conditions. If you want to read the plug for a condition, be it a 1/4-mile pass or after a misfire, it’s best to do so immediately after the event; plugs change color quickly.
3. A lean read means there’s a shortage of fuel; things are hotter and prone to failure. Some builders tune slightly lean of perfect fuel-to-air proportions (called stoichiometric balance – “stoich” – or perfect proportions) to get more power, but that’s a make-or-break option. Rich indicators mean there’s too much fuel, but rich is safer, runs cooler and breaks less parts.
4. Reading the plug is a good way to investigate a misfire. A hole that’s got no spark will look rich, while lean tones mean there’s a problem getting fuel to the cylinder. Black specs mean there’s some detonation – time for concern – and oil means you’ve struck some.
PAGE 2
 |
 |
|
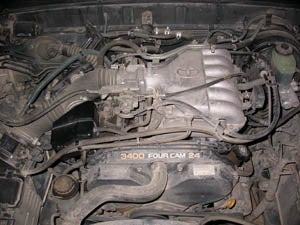
Manifold on, manifold off. Access to the injectors necessitated no more than two hours. |
As for plug wires, the OEM Toyota wires have the year of their manufacture printed on them – ours were original 1997 parts. We bought a set of OEM replacements despite all the wires ohming out fine with the Tenbuck-O-Meter (if you haven’t bought a $10 multimeter, you’re authorized to do so now). It was cheap insurance to replace wires that had given 175K of service. Also, as plug wires are of different lengths, it’s not as easy to swap two of them for comparison.
Test & Swap Ignition Coils
With plugs and wires ruled out, the next object of our potential disaffection was a sour coil. The 3.4-liter V6 in the gen-three 4Runners and 1995-and-later Tacos uses a waste-spark system, where one coil fires two cylinders (#4 is fired by the coil on #1), and fires them both simultaneously (there’s a second spark in each cylinder to clean up the “blow” cycle before new air and fuel are sucked in). One coil runs two cylinders – twice – and that double-duty helps them wear out, though typically in high-mileage vehicles.
Test figures for the coils were readily available in the Haynes (which also has a guide to reading plugs) and the factory service manual (FSM). With the intake tract out (stay tuned for bargain flow improvements in a later story, including the famous deck-plate mod), all three coils were easily removed, and new ignition wires meant none of the old connectors were stuck, either. Working one at a time (can’t emphasize that enough), we pulled a coil, labeled it with a garage-issue Sharpie (write info on parts – they don’t care), and tested resistance.
 |
|
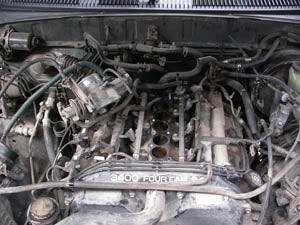
The command link for the injector is the hardest part to remove once the O-rings have been zapped with a penetrating lube like Liquid Wrench. |
On the ’97 4Runner, primary resistance (at the top connection) was between .67 to 1.05 ohms, but all of the coils tested at about 1.2 ohms. This is a little high, but most importantly they matched. Since there was only one bad cylinder, not three or more, we took the consistent measurement to be a good sign. Secondary resistance (from the coil body to the drop-socket) was rated 9.3 to 16K ohms, and the coils tested between 11 – 12K. With every coil testing evenly, all that was left was to swap two of them and chase the miss – with the #1 and #3 cylinder coils switched, the miss stayed at Hole #4 instead of migrating to Hole #6. Another finger pointing at the #4 injector.
PAGE 3
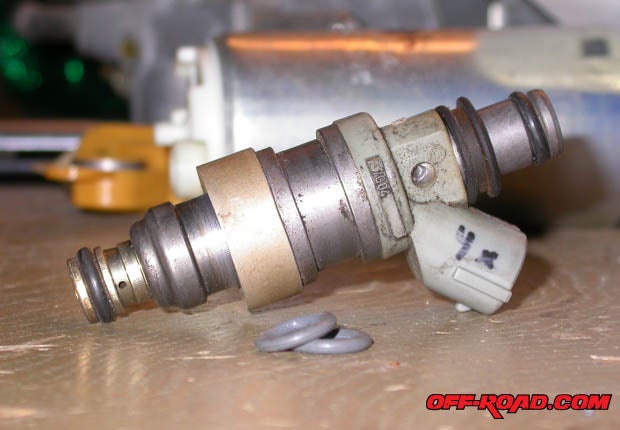 |
| An “X” marks the suspect shooter, though we’ve told a rebuild would likely reinvigorate all six injectors. |
Swap Swap, Test Test? Injector Replacement
The application of “sensible method” eliminated the cheapest available scoundrels behind this misfire: the plugs, wires and coils appeared fine. According to the code reader (P0304), and despite swapping parts, the miss stayed at #4. Investigating the next potential villain, we followed our “convenient-to-difficult” methodology to the injectors.
First, we washed a jug of Techron through the injectors. We learned there is Techron (awesome injector cleaner) and injector cleaner with Techron (not as awesome, but sold in bulk at Costco with a suspiciously large “Techron” label). Neither worked. Then, in a breach of scientific behavior, we took a calculated risk and attacked the #4 injector directly, replacing it outright instead of test-swapping two injectors. Enough extant evidence indicated this injector was at fault. Our decision was more easily administered by heisting a used grey injector from a friend’s toolbox (which he testified was workin’ when he replaced it with bigger injectors to support his new blower). You can do the same at the junkyard – just match colors.
Attention to the injectors is hastened by the relative ease of R&Ring the 3.4-liter V6’s upper manifold. You can’t service these injectors without removing the upper and lower halves of the upper clamshell manifold, but with the 3.4, it’s a direct process. Bring a can of Liquid Wrench or another non-corrosive penetrant to the party, because there are hoses to remove and a few long bolts (which could use a little cleaning afterwards). Liberal application of the penetrating spray helps things slide apart. Even the metal gaskets, handled gently and re-torqued properly, are reusable. You will need to unstring the throttle cables, and remove some brackets and a number of hoses (using Liquid Wrench on what sticks). Yank the throttle-body too.
 |
|
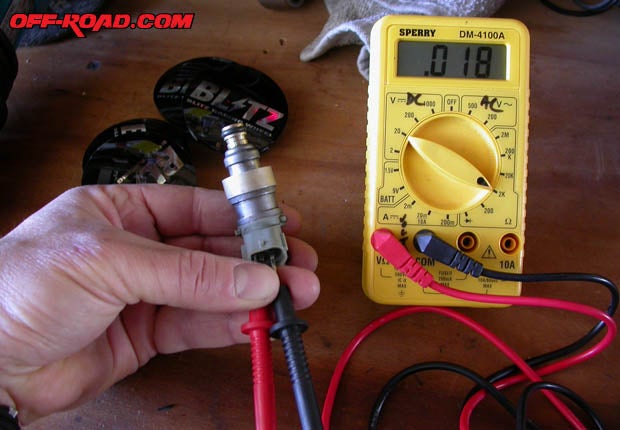
Testing… Tenbuck-O-Meter reveals the bad ohm rating and the scoundrel is identified. |
We were after the #4 injector, which means one of two fuel rails would be removed too. More Liquid Wrench helped with the soft connections, loosening the O-rings and preventing damage when the fuel rail was pulled. Injector O-rings aren’t hard to come by, but it’s one more thing not to buy… once you’ve unbolted a fuel rails, remove it gently because the injectors are only held in place by the rail and might pull out with the rail when it’s removed.
Testing an injector is another exercise in ohms. Via the prongs of its plug, we ohmed the loaner from “mechanically supercharged neighbor guy.” Ohms for a good injector live between 12 and 16; our neighbor tested them to 14 ohms. We pulled the suspect injector from Hole 4, and it tested at .018 ohms. Ohm ohm, that’s the one: ohms in the basement (‘cause that’s where all the bass went), and suspicions confirmed upstairs. You can also use a mechanic’s stethoscope (or a long skinny screwdriver, cupped to your ear) to listen to an injector, which should click regularly in lockstep with RPM. A mechanic’s stethoscope is another 10-buck tool you should own; you can listen to a water pump, power-steering pump or any part with a heartbeat.
The solution to our intermiss, and subsequent R&R of injector #4, was the result of the application of the sensible method. Every ignition part we diagnosed and tested indicated a problem (and a fuel shortage) in Hole 4. We followed the knowledge and made an educated leap, replacing one injector with the expectation that those indicators were on-target. Testing of the suspect injector confirmed it was headed for a life of crime. With everything back together and a kick of the starter, the misfire was gone. It’s an old truck, so that begs the question: what’s next?
 Your Privacy Choices